Table of Contents
- Upgrade Roadmap: Matching Mods to Your Riding Goals
- Surron Controller Upgrade: The First Real Power Mod
- Battery Upgrades: 72V Conversions and BMS Limits
- Surron Supermoto Conversion: Wheels, Tires, and Brakes
- Suspension, Ergonomics, and Weight Reduction
- DIY vs. Professional Installation: Cost and Reliability Trade-Offs
- Insurance, Liability, and Street Legal Compliance
- Long-Term Reliability and the Upgrade Ecosystem
- Frequently Asked Questions
Last Updated: September 30, 2026
Upgrade Roadmap: Matching Mods to Your Riding Goals
A Surron e-bike performance upgrade guide starts with one question: what are you actually building? The stock bike is a compromise, and every part you change shifts that balance somewhere else. This guide walks through the full upgrade path, from controller mapping to supermoto conversion, so you spend money once instead of twice.
Street, Track, or Trail: Three Build Paths
Pick your build path before you buy anything.
- Street and supermoto: prioritized braking, tire grip, and chassis rigidity. Power matters less than control.
- Track days: suspension damping, unsprung weight, and heat dissipation drive lap times.
- Trail and off-road: torque curve, ground clearance, and reliability under sustained amp draw.
|
Build Path |
First Upgrade |
Second Upgrade |
Skip Until Later |
|---|---|---|---|
|
Street / supermoto |
Brakes and tires |
Suspension |
Motor swap |
|
Track |
Suspension and wheels |
Controller mapping |
Cosmetic mods |
|
Trail |
Controller and gearing |
Battery capacity |
Street legal kit |
Surron Controller Upgrade: The First Real Power Mod
A controller upgrade is the highest-return first mod because it changes how the existing motor delivers power. Stock controllers limit phase current, which caps acceleration regardless of battery size. Aftermarket units let you tune the torque curve directly.
Phase Current and Thermal Throttling: What to Watch
Phase current controls low-speed punch; battery current controls sustained pull. Push phase current too high and the motor windings heat up fast. That triggers thermal throttling, where the controller cuts output to protect itself. The result feels like the bike “giving up” mid-ride.
Watch these three things:
- Voltage sag under load, which signals your battery can’t supply the amp draw
- Motor phase temperature after hard acceleration runs
- Controller firmware version, since mapping tables change between releases
NHTSA guidance on electric vehicle safety
Battery Upgrades: 72V Conversions and BMS Limits
The 72V battery conversion is the most misunderstood upgrade in the Surron world, and it is also the one most likely to end a build early. More voltage raises top-speed potential, but only if the controller, motor, and battery management system (BMS) can all handle it together. Treat the pack as one node in an integrated performance ecosystem, not a standalone horsepower purchase.
What 72V Actually Changes
Voltage is electrical pressure. Going from a 60V-class pack to a 72V-class pack raises the ceiling on RPM and top speed, but it does not automatically raise torque. Torque comes from current. That is why a 72V pack on a stock controller often feels slower off the line than the original setup: the controller is still limiting phase current, and the extra voltage is doing nothing useful at low speed.
- Nominal voltage (what the pack is called) versus fully charged voltage (what the controller actually sees on a fresh charge). A 72V nominal pack can sit near 84V hot off the charger.
- Continuous discharge rating in amps, this is the number that governs sustained pulls, not the peak rating on the marketing page.
- BMS continuous and peak cutoffs, the BMS will throttle or shut off before the cells are damaged, and that cutoff is often lower than the controller’s demand.
BMS Limits and High-Discharge Cells
The BMS is the pack’s referee. It caps continuous discharge, balances cells, and cuts power on over-temperature or over-current events. A pack rated for a high peak output may still throttle continuous amp draw, which shows up as voltage sag under sustained load, the bike feels strong for two seconds and then goes flat.
Wiring, Connectors, and the Harness
Stock connectors and wire gauge are sized for stock current. Push more amps through them and resistance turns into heat, and heat at a connector is how builds fail. Upgrade the harness with the pack: heavier gauge main leads, connectors rated for the new continuous current, and a fuse or breaker sized to the pack rather than the original controller.
The Dependency Chain
A battery upgrade is only as good as the weakest part downstream of it. The practical order of operations:
- Confirm the controller’s maximum input voltage and continuous current rating.
- Confirm the motor’s phase current and thermal limits, a bigger pack does not make the motor handle more heat.
- Confirm the BMS continuous rating exceeds what the controller will pull.
- Confirm the harness and connectors are rated for the new current.
- Only then install the pack and re-tune the controller mapping.
NHTSA guidance on electric vehicle safety
Surron Supermoto Conversion: Wheels, Tires, and Brakes
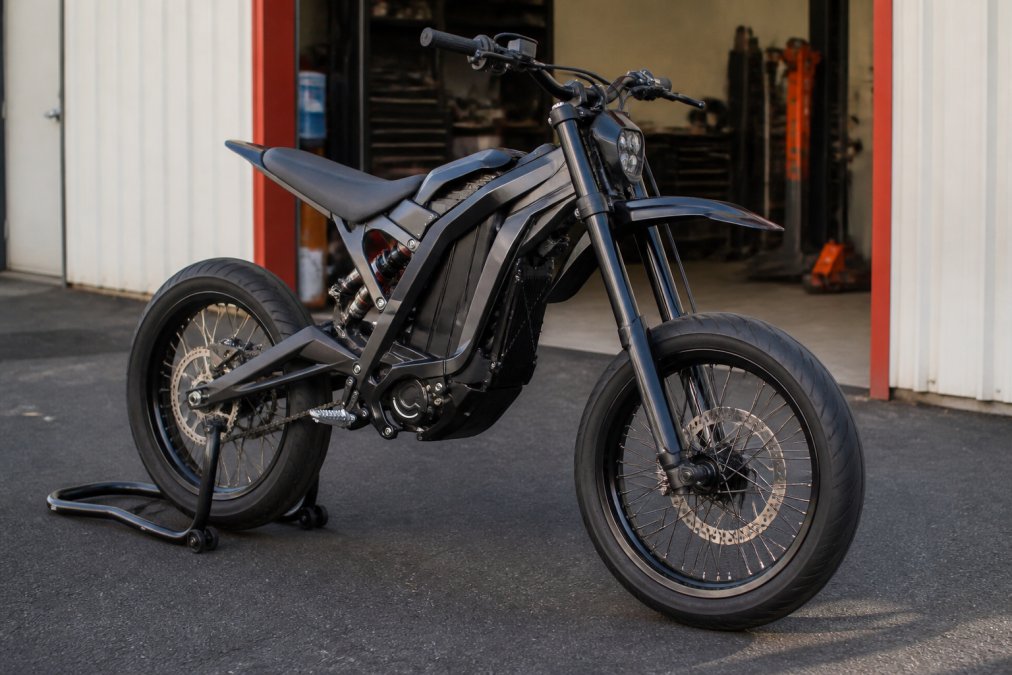
A Surron supermoto conversion is a wheel, tire, and brake package that turns an off-road bike into a street-capable machine. Smaller diameter wheels with street rubber lower the center of gravity and sharpen steering. That’s the whole point.
Tire Selection and Unsprung Weight
Unsprung weight is the mass of everything below the suspension: wheels, tires, brake rotors. Cutting it improves how quickly the suspension reacts to bumps. Lighter wheels and rotors do more for handling than almost any engine mod.
For tire selection, match compound to surface:
- Street: softer compound, more grip, wears faster
- Track: dedicated track compound, best heat tolerance
- Mixed use: harder compound, longer life, less grip in the wet
Suspension, Ergonomics, and Weight Reduction
Suspension tuning is where most builds leave free performance on the table. Damping adjustment lets you match the fork and shock to your weight and riding style. Revalve or respring before you buy anything exotic.
Weight reduction strategies, ranked by return:
- Lighter wheels and rotors
- Lithium battery pack swap
- Aftermarket drivetrain components
- Removing unused brackets and hardware
DIY vs. Professional Installation: Cost and Reliability Trade-Offs
Most electrical work is DIY-friendly; most chassis work is not. That split is real, but it is too coarse to make a spending decision on. The useful question is not “can I do this?” but “what does it cost me if I get it wrong?” That is the angle most build guides skip, and it is where the money actually is.
The Real Cost of a Mistake
Labor rates at independent motorcycle and powersports shops commonly run in the range of a standard shop-hour rate, and a full supermoto conversion, suspension revalve, or wheel build can consume several hours of that. But the number that matters more is the cost of a failed DIY attempt:
- Controller and firmware work: a mis-flashed controller or reversed polarity can brick the unit. Replacement cost is the unit itself, plus the downtime.
- Battery work: a mis-wired pack is a fire risk, not just a performance risk. This is the one category where “I’ll figure it out” is not an acceptable answer.
- Brake hydraulics: a poorly bled system or a cross-threaded banjo bolt fails at the worst possible moment. The cost is not the part, it is the crash.
- Wheel lacing and truing: a wheel built with uneven spoke tension fails gradually, usually at speed. A shop with a truing stand does this in an hour; a first-timer does it in a weekend and may still be wrong.
- Suspension revalve: shim stacks and oil weights are a system. Getting it wrong means paying twice, once for the parts and once for the shop to redo it.
Where DIY Wins
These jobs are genuinely DIY-friendly because the failure mode is a re-do, not a catastrophe:
- Controller swaps and mapping updates (plug-and-play with a laptop on most current models)
- Ergonomics: handlebars, pegs, seat, lever position
- Drivetrain consumables: chain, sprockets, brake pads
- Tire changes, if you have spoons and patience
- Cosmetic and weight-reduction work: removing brackets, swapping hardware
Where Professional Wins
These jobs have a failure mode that is expensive, dangerous, or both:
- Wheel lacing and truing
- Brake bleeding and hydraulic line work
- Suspension revalve and respring
- Any structural welding or frame modification
- Battery pack assembly or BMS replacement
A Practical Decision Rule
Ask two questions before every job:
- Is the failure mode a re-do or a wreck? Re-do, do it yourself. Wreck, pay the shop.
- Do I have the tool, and will I use it again? A torque wrench, a truing stand, and a vacuum bleeder are the three tools that separate DIY-capable jobs from shop jobs. If you are buying a tool for one job and never touching it again, the shop is usually cheaper.
Documenting the Build
Whichever path you take, keep a build log: part numbers, torque values, firmware versions, and who did the work. It matters for warranty claims, for resale, and, as the next section covers, for insurance and inspection. A build with receipts and a log is worth more and is easier to defend than one with a box of unlabeled parts.
Insurance, Liability, and Street Legal Compliance
Street legal compliance is where performance builds get complicated. Most jurisdictions require lights, mirrors, a horn, and a speedometer for road registration, and a modified bike may need re-inspection. Insurance and liability implications follow the same logic: an insurer can deny a claim if a modification made the bike unsafe or unregistered.
Before you ride on public roads:
- Confirm your state’s registration requirements for converted bikes
- Check whether your policy covers modifications
- Keep receipts for every part installed
- Document the build for inspection
FMVSS motorcycle equipment standards
Long-Term Reliability and the Upgrade Ecosystem
Long-term reliability testing is the angle most build guides skip. Parts that work in isolation can fight each other over thousands of miles. A controller tuned for peak power shortens battery life. Stiff suspension improves track feel and punishes trail comfort.
Frequently Asked Questions
What are the best upgrades for a Surron e-bike?
Start with a controller upgrade, which delivers the biggest power gain per dollar. Pair it with a 72V battery upgrade to avoid voltage sag under load. Suspension tuning and braking upgrades come next for safety at higher speeds. For street riding, a Surron supermoto conversion with proper wheels and tires transforms handling. Weight reduction and ergonomic adjustments (bars, pegs, seat) round out a balanced build. Match each mod to your riding style, and upgrade in stages so you can test reliability before adding more power.
Do I need a new controller to get more power out of my Surron?
The stock controller limits phase current and peak power output, so yes, a Surron controller upgrade is the most direct path to more torque and acceleration. A replacement controller lets you adjust controller mapping, raise amp draw, and change the torque curve. Look for one with thermal management features and firmware update support. If you pair a new controller with a battery that cannot deliver high-discharge current, you will hit voltage sag and lose much of the gain.
How do supermoto wheels improve Surron performance?
Supermoto wheels reduce unsprung weight and put a wider, grippier tire contact patch on pavement. That translates to sharper turn-in, more predictable braking, and higher cornering confidence. The smaller diameter also lowers rotating mass, which improves acceleration and regenerative braking response. For riders doing street or track days, a Surron supermoto conversion is often the single biggest handling change you can make, and it addresses braking and stability at the same time.
Is it worth upgrading the motor on a Surron?
For most riders, no. The stock motor handles moderate power increases from a controller and battery upgrade without issue. Motor swaps make sense when you are chasing peak power output beyond what the stock unit can dissipate, or when you need a different motor phase configuration for a specific build. Upgrading the motor also demands a matching controller, wiring harness, and cooling strategy. Do the controller and battery first, then decide if the motor is the remaining bottleneck.
What are the most common reliability mods for Surron owners?
Reliability mods focus on heat dissipation and electrical integrity. Add a battery management system with proper thermal cutoff, upgrade the wiring harness to handle higher amp draw, and improve airflow around the controller and motor. Regular firmware updates keep the controller logic safe. Check torque on chassis and drivetrain bolts after every few rides. Long-term reliability testing by owners consistently shows that heat and loose connections cause more failures than power levels themselves.
Can I make my Surron street legal?
Street legal compliance varies by state. You typically need lights, mirrors, a horn, a license plate mount, and a title or manufacturer statement of origin. Some states classify Surrons as off-road vehicles only. Check your state’s motor vehicle department rules before investing in a street build. A Surron supermoto conversion with DOT-rated tires helps, but the paperwork and equipment requirements matter just as much as the hardware.
Building a fast Surron is easy. Building one that stays fast, stops hard, and passes inspection is the real project. Supermoto wheels and tires stocks specialized supermoto conversion kits, motocross racing wheels, and components for Surron and Talaria builds, so you can source wheels, tires, and braking upgrades from one place instead of chasing fitment across five vendors. Get started with Supermoto wheels and tires and build a bike that performs on the street, the track, and the trail.